
This cake is super easy and I created the healthiest version I could because we also had cotton candy, and I'm too health conscious to not ATTEMPT to create a healthier birthday cake for a one year old and a bunch of kids! Here is my recipe:
Yields 1 four layer cake and 1 small smash cake
Cake:
2 eggs
3 1/2-4 cups unbleached flour
1 tsp baking powder
1/2 tsp baking soda
1 1/4 cups raw sugar or honey
1/2 tsp salt
3 tbsp homemade vanilla
1/2 cup vanilla yogurt
2 cups coconut oil (or butter)
1 3/4 cups milk (almond, coconut, cows, whatever you use!)
2/3 cup sprinkles (not nonpareils)
Frosting:
1 large container of whipping cream
1 block cream cheese
1 tbsp vanilla
1/4 cup honey
1 tsp cinnamon
For the cake:
Mix all dry ingredients in a bowl. In a separate bowl, blend together butter, milk, vanilla, and yogurt. Slowly, in a stand mixer, add the dry ingredients to the wet. Gently fold in the sprinkles. Fill cake pans (be sure they are oiled or buttered beforehand) and place in a 350 degree oven. Cakes will take about 35 minutes to bake.
For the frosting:
In a stand mixer, whip the whipping cream into whipped cream. Depending on the speed you use, this can take quite some time, so be patient! Once it is a thicker consistency, add the cream cheese, vanilla, honey, cinnamon, and blend until smooth. You can always add more honey to taste, again I tried making the healthiest cake possible for babies!


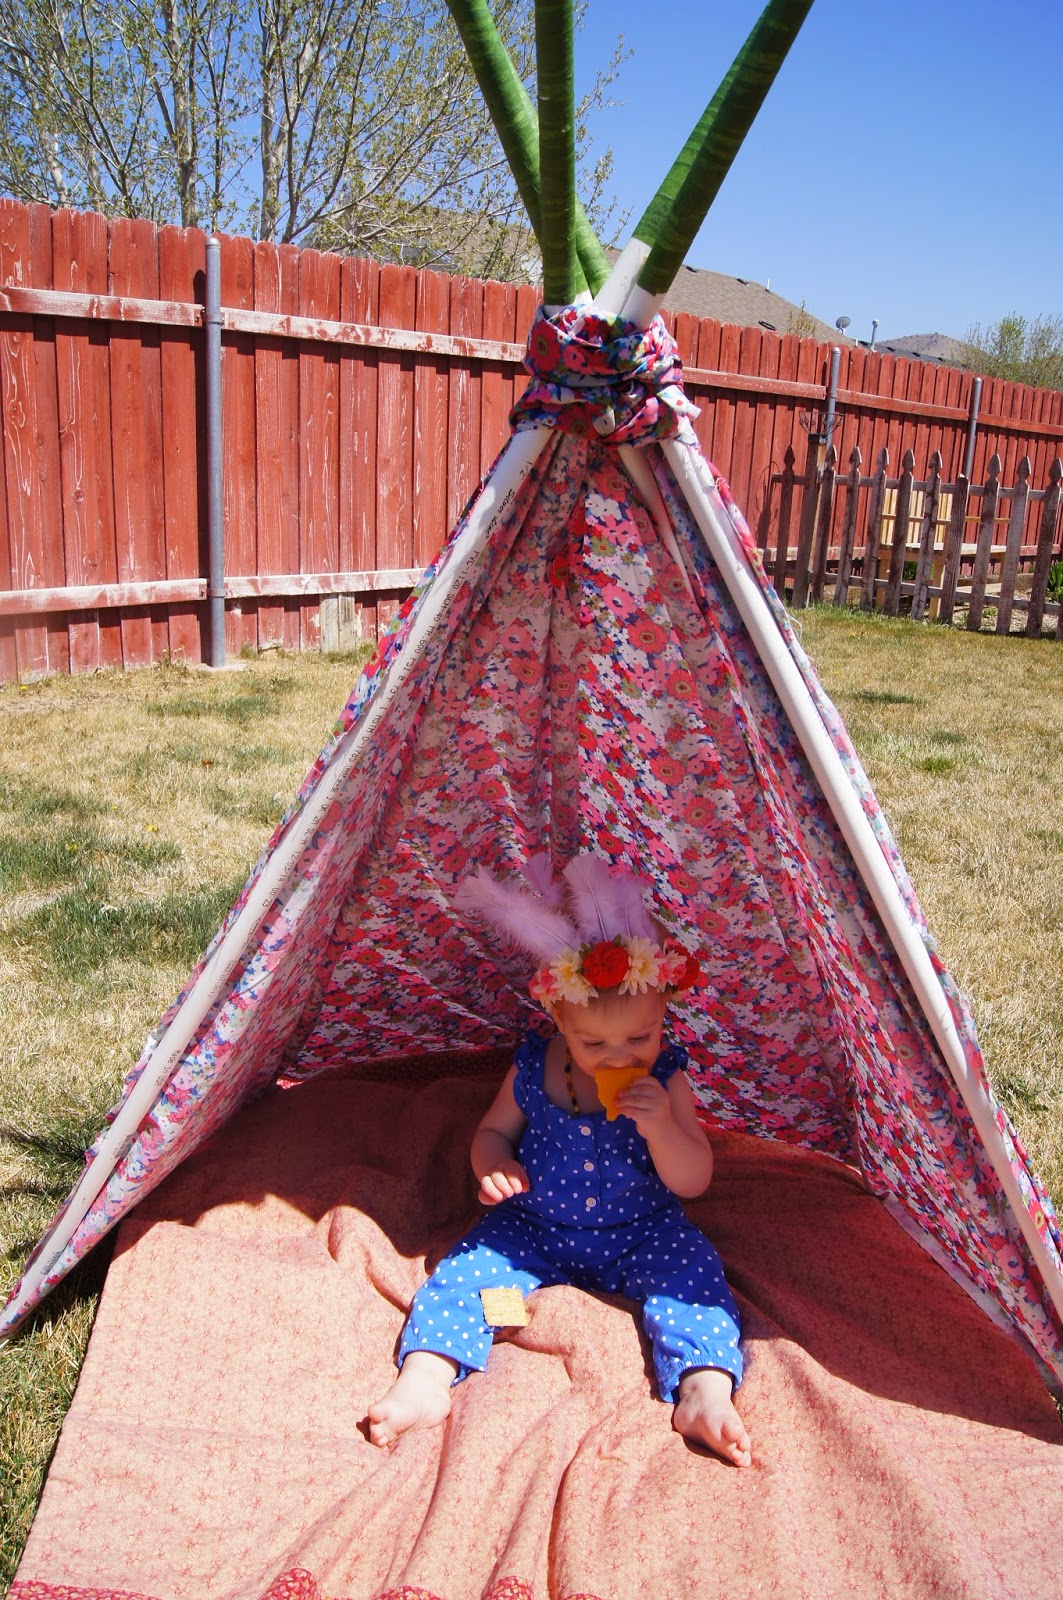
DIY teepee:
I unfortunately did not take step-by-step photos for this, and I know that is a HUGE disappointment! Forgive me! Here it is set up in the yard at the party.


2/3 cup sprinkles (not nonpareils)
Frosting:
1 large container of whipping cream
1 block cream cheese
1 tbsp vanilla
1/4 cup honey
1 tsp cinnamon
For the cake:
Mix all dry ingredients in a bowl. In a separate bowl, blend together butter, milk, vanilla, and yogurt. Slowly, in a stand mixer, add the dry ingredients to the wet. Gently fold in the sprinkles. Fill cake pans (be sure they are oiled or buttered beforehand) and place in a 350 degree oven. Cakes will take about 35 minutes to bake.
For the frosting:
In a stand mixer, whip the whipping cream into whipped cream. Depending on the speed you use, this can take quite some time, so be patient! Once it is a thicker consistency, add the cream cheese, vanilla, honey, cinnamon, and blend until smooth. You can always add more honey to taste, again I tried making the healthiest cake possible for babies!
Amelia loved it!
I unfortunately did not take step-by-step photos for this, and I know that is a HUGE disappointment! Forgive me! Here it is set up in the yard at the party.
It was amazing at providing her some shade!
Here are some instructions:
5 1/2 inch 4 foot tall PVC pipes
3 yards of fabric
Floral tape
Hot glue and gun
This was a no-sew project. I set up and measured where I wanted the pipes to be on the fabric and made the cuts. I then glued the fabric around each pipe from top to bottom, while covering the pipe entirely in fabric other than about 1 foot at the tops. I glued the fabric while the pipes they were propped up! It made it much easier!
Once that was finished, I tied a piece of left over fabric around the top, just where the fabric ends to give it a more finished look. I then wrapped the exposed pipes in floral tape!
It was fast and easy, that I promise.
We bought an amazing cotton candy machine! It was such a great addition to the party, and looked pretty on the food tables! Who doesn't love cotton candy?!
I made this "All About Me" poster for the party. It included current weight, height, teeth count, favorite activities, songs, foods, toys, animals, princesses, words she says, and other milestones! It will be a treasured thing to have as she gets older! It was fun for family and friends to learn about her as well!
Porch set up: banners, balloons and crepe paper! We used all the colors for this party!
Food tables!
I also made this floral headdress for my princess. I used floral wire, hot glued flowers all around, wrapped it all in floral tape, the glued and floral tapped the feathers to the front!
More photos of the cotton candy bouquets!
WE put the melon slices on large Popsicle sticks! Fun and less messy for the kids!
Okay, so maybe I was a little obsessed with the cotton candy...
I did not get any great photos of the favors I made, but they were cute crepe paper crowns for all the kids! I started them out the same as Amelia's floral headdress. A circle of wire covered in floral tape. I cut 4 inch stripes of various colored crepe paper, leaving one inch in the center cut the ends into three strips to make them "wispy." Then wrap them around the crown and glue them to it for security. They were surprisingly durable!
That's them on the table there!
I would also like to publicly thank all that attended and made that day truly special for our sweet girl! It was a day to remember!
xo
Chelsea
No comments:
Post a Comment